

-80x69.png)
Plastic blow molding is often used to create everyday items like large industrial tanks, automobile parts, soap and water bottles, and other customized barriers and drums. The heated plastic tube is blown up like a balloon during the blow molding process until it fits the mold’s shape, producing an accurate and effective hollow product. This article will thoroughly analyze the blow molding process, including its various variations, the materials used, its advantages, and advice on selecting the best technique for your unique needs.
What is Blow Molding?
Hollow plastic components can be manufactured, molded, and put together with the blow molding process. For example, blow molding is used to produce hollow shapes in glass bottles. A plastic tube, also known as a parison or preform, is heated and inflated during the blow molding process. The parison is positioned between two molds to give the tube the right shape. The tube is then stretched to alter its shape to fit the mold and lower its walls. The object is prepared for the addition of the other components once it has been cooled, launched, and molded by the blowing process.
Plastic Blow Moulding Process Step By Step
In the process of blow molding, materials are heated and melted, mixed, formed, cooled, and then the finished product is removed. Other methods, such as heating, adding chemicals, and applying colors, can be used in various plant production or assembling processes. The design and the usage of the finished product explain these extra forms. The following are the steps involved in the blow molding process:
-
Step 1: Plastic Material Preparation
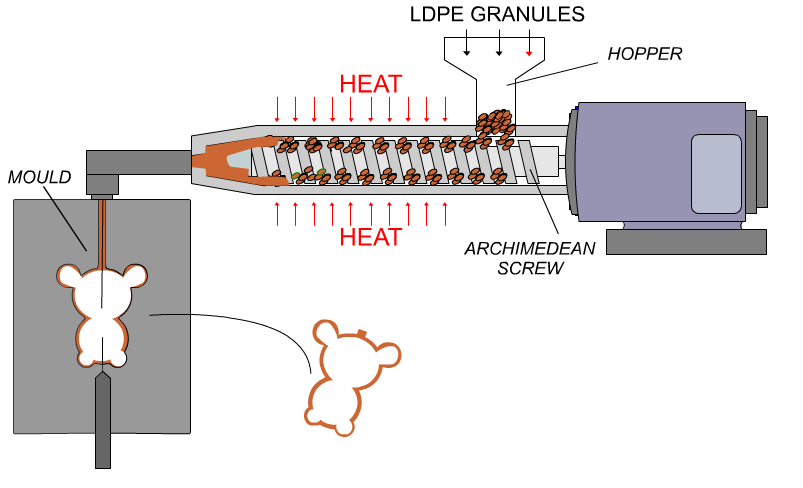
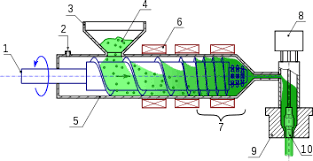
Plastic feeding is the most important step in the blow molding process. The plastic is typically shaped using a pelletizer machine. Using vacuum pumps, pellets are transferred from big bags or containers into storage or dirty substance bins. The rate at which materials are fed into the plastifier or extruder is managed by a revolving feeder located at the bottom of the silos. The method involves moving the stored pellets to the extruder container using compressed air. When plastic pellets can be transported directly from large bags or containers to the extruder using completely distinct technologies, there is no need for a separate delivery system.
-
Step 2: Melting the Plastic
Before entering the machine, the plastic resin is heated and treated to make it malleable and soft. The extruder barrel is surrounded by electric heating components, which help to raise the temperature to a point where the plastic melts. The extruder screw is made up of multiple pieces, each of which has a specific function. This includes general care, squeezing, measuring, and feeding the plastic. The extruder screw’s function is to effectively mix and compress the plastic so that a uniform extrusion is possible.
-
Step 3: Parison Formation
Parison expulsion, also known as preform infusion, prepares the parison or preform for stretching or shaping. Common methods for doing this include pressing the plastic into a pre-made shape or extruding it via a mold.
-
Step 4: Mold Preparation
There are two sections on the form. The mold is filled with the parison. The parts of the mold hold the parison inside the hollow cavity.
-
Step 5: Parison Placement and Clamping
Fixing or “clamping” refers to the process of using an element to hold the preform in place. Except for one aperture, which is usually where the air is entered, the parison’s ends are sealed.
-
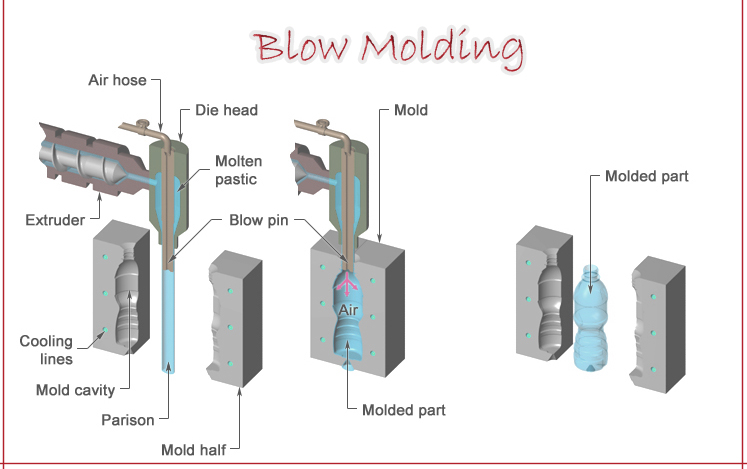
Step 6: Blow Molding
A piece of equipment that clamps or fixes the preform keeps it in place. Except for one hole, which is frequently where air is introduced, the mold’s apertures are largely sealed. The process by which the plastic takes on its shape is called swelling or blow molding. As a result, the profile extends till the bucket shape is achieved.
-
Step 7: Cooling and Solidification
The next step is the chilling and cooling process. The rate at which the plastic cools after striking the bucket frequently determines the final product’s size. The shape opens, and the thing is liberated after cooling.
-
Step 8: Product Ejection & Trimming
The majority of blow molding machines have features like trimming and eliminating excess plastic from the boundaries, like the parts holding the preform. In rare cases, there is a line at the top and bottom of the object, especially where air is injected. This material has been turned on its edge. To cut down on waste, some systems gather, grind, and feed extra materials back into the machines that use them.
-
Step 9: Leak Test
One popular method for assessing the quality of bottles and packing materials is the spill test. Then, by monitoring its weight, the device will determine if smoke enters or exits the container. The container is disposed of, and the spill is cleaned up if it occurs.
Primary Materials Used in Plastic Blow Molding
- Polyethylene (PE)
- High-Density Polyethylene (HDPE)
- Low-Density Polyethylene (LDPE)
- Polypropylene (PP)
- Polyethylene Terephthalate (PET)
- Polyvinyl Chloride (PVC)
- Polystyrene (PS)
- Acrylonitrile Butadiene Styrene (ABS)
- Polycarbonate (PC)
- Thermoplastic Elastomers (TPE)
- Nylon (Polyamides, PA)
- Engineering Resins
- Biodegradable Plastics
What Are the Types of Blow Moulding?
Four primary types of blow molding exist. They differ, as evidenced by the way the parison or preform is constructed. The term “parison” is usually associated with a particular process known as extrusion blow molding, whereas “preform” describes a heated plastic tube. Examples of various blow molding techniques include the following:
-
Extrusion Blow Molding
Popular ways to perform the extrusion blow molding process.
-
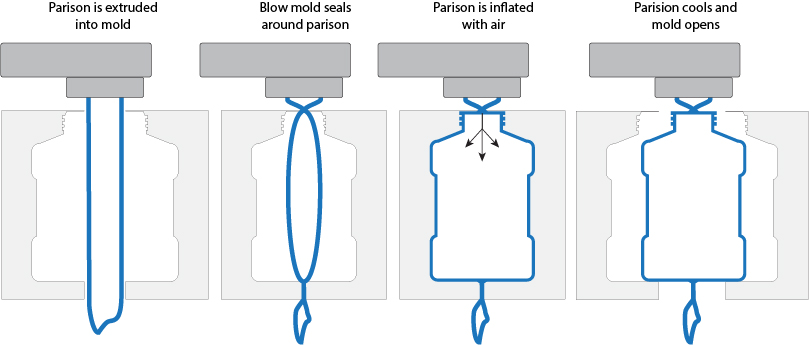
Continuous Blow Molding
A heated plastic piece called a parison is ejected by a mold with two pieces that seal around it to a predetermined length during the extrusion blow molding process. While the parison comes to a certain conclusion, the opposing conclusion is modified to match the conversation.
The parison is enlarged in a condensed discourse. The hot liquid plastic cools when it comes into contact with the often-cold pipes. Once the measurements have stabilized, the product is taken out of the mold. The way the plastic is formed into a tube (called the parison) distinguishes the two primary types of blow molding. Items are made using two different blow molding techniques.
Small to medium-sized plastic items are produced using the Continuous Blow Molding technique. It is simpler to use and less expensive. Larger things should be made of plastic that has the proper thickness and melting properties.
-
Continuous Extrusion Blow Molding
Another technique used to make heat-sensitive polymers, such as PVC, is continuous extrusion blow molding; this is frequently done to prevent any drooping that could lower the product’s quality. This method ejects the parison from the instrument continuously. Polymer mixing is an ongoing process. The end-shaped pieces are then cut to the proper size once the parison has been forced out.
How these form elements can be assembled depends on the form’s structure and order. Another kind that can be either vertical or horizontal is the pivoting wheel. In this type, specific shapes can be seen on a rotating wheel’s sides. The holding, cutting, stretching, cooling, and launching sections of the revolving wheels are all attached to the blow molding forms. As the molds go around the wheel, they are handled with care.
-
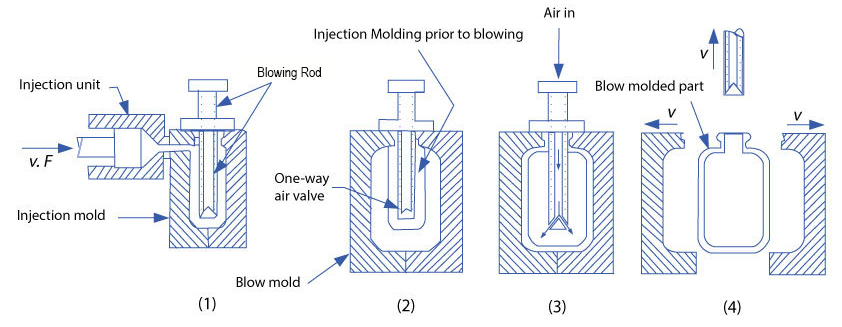
Injection Blow Molding
First, the plastic is melted and mixed to create the infusion blow molding handle. A screw extruder and a plasticizer, which both commonly use a certain type of screw, are used to do this. This method compares it to the process of irregular expulsions. The primary distinction is that it makes use of a mold with a metal rod in the middle.
These metal rods can spin or rotate because their bases are shared. Three pieces, each representing a step in the blow molding process, make up each pole. The metal rod is placed into the preform once the batch is complete. One of the two buckets on the performer is stationary, while the other is movable. After the liquid is pumped in, the plastic is chilled to the proper consistency to guarantee that it keeps its shape.
The final shape of the preform is then provided by inserting it into a fresh set of molds. The parts are air-blown into their shape in the second stage of the injection blow molding procedure. Depending on its size, the plastic must cool before the shape can be released. The opening step, which opens the mold to release the product, marks the end of the injection molding process. Some injection molding machines could have additional parts. The subsequent stages involve additional processes, including molding, coating, and additional heating or chilling.
-
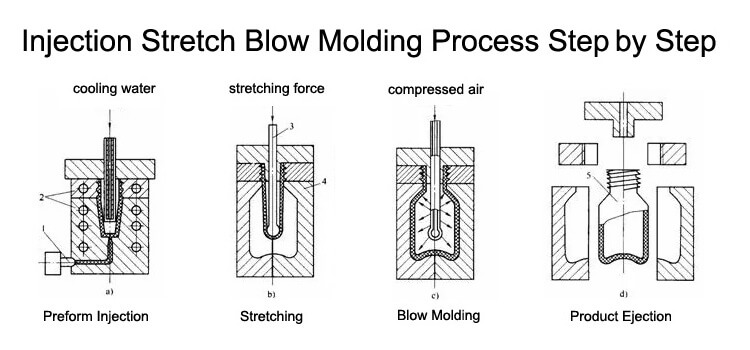
Stretch Blow Molding
Stretch blow molding is also known as stretch injection blow molding. Three necessary processes are also combined in this preparation, along with an additional step prior to the blow molding process. In stretch blow molding, the preform is made by pouring molten or softened plastic into a mold that has a metal rod in the middle. The preform is then placed inside the mold, where the blow molding process will shape it.
The preform must first be stretched or extended to a predetermined size with a specialized tool before it can be inflated. After stretching, the plastic decomposes or softens before continuing to stretch to assume the final product’s shape. After the product has cooled and completed its shaping, it is now prepared for release. In addition to plastic, stretch blow molding can produce various materials. It can also be extended using a machine called an extrusion blow molding machine.
A tool can be used to push out and extend the soft plastic shape. Stretch blow molding is mostly used to produce products by stretching plastic in two different directions.
-
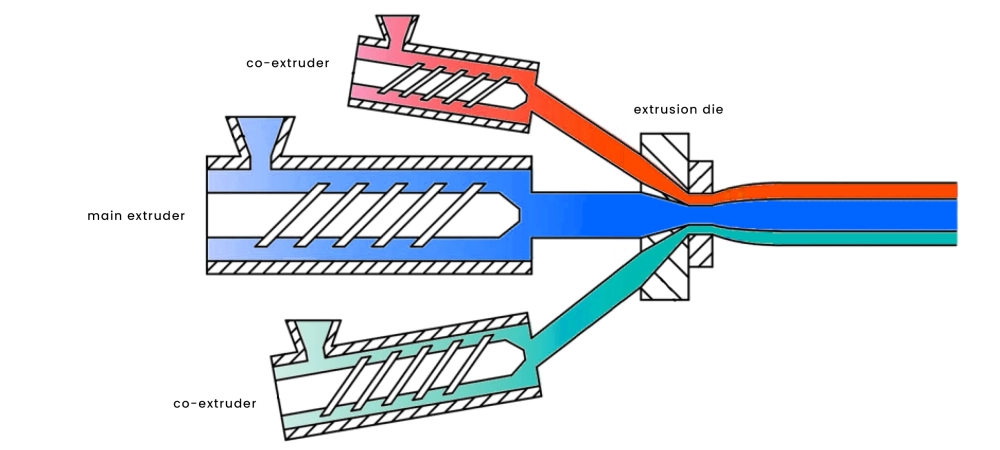
Coextrusion Blow Molding
When high strength is required while maintaining low costs and high stiffness, coextrusion blow molding is used. The process involves combining different types of plastic to create products by gathering and arranging the melted plastic from different sources in a special section called a coextrusion head, which is similar to a collecting machine. The molten material is forced through a mold with numerous apertures by various rams pushing on the coextrusion head, and the standard blow molding procedure resumes once the multilayered parison is formed.
Blow Molding Advantages
1. Cost-Effective Production
There is less pressure needed for blow molding. As a result, equipment is inexpensive. Opening a closed mold to produce outside strings or large, divisible pieces is now simpler and less expensive. Moreover, this technology has reduced labor expenses.
2. Versatility in Design and Size
Most plastic containers for specific liquids that are currently available on the market have undergone this process. In actuality, the widespread usage of engineering has enabled engineers to develop a vast array of projects and applications for several strong reasons.
3. Lightweight Products With Multiple Production Methods
Additionally, it supports a range of production techniques and has expanded production capacity, enabling traffic suppliers and manufacturers to make more things in less time. Several techniques are used in blow molding to produce finished goods. By forcing materials through a lengthy tube during manufacturing, blow molding assists companies in providing a broad range of goods. The molten plastics are injected into the blow mold rather than forced through the discus. By altering designs and moving closer to total automation, this development continues to improve these production techniques.
4. Consistent Wall Thickness
One benefit of blow molding is the employment of machines. Because of its exact process, it guarantees that components fit properly and helps produce goods with minimal waste, which increases output.
5. Fast Cycle Times
By enabling businesses to produce a vast array of plastic goods to satisfy consumer demands, blow molding has completely transformed the manufacturing industry. This plastic production method’s high output and manufacturing speed are noteworthy outcomes.
Applications of Blow Molding
Many different businesses employ blow molding. Many everyday objects are made via blow molding. A list of common goods and sectors that successfully use blow molding is provided below.
- Containers and Bottles: Plastic bottles and containers for food, cosmetics, household goods, and vehicle parts are made via blow molding.
- Car Components: Many car components are made using the blow molding technique, which produces large, robust, and lightweight parts. Examples include storage containers, fuel tanks, and packaging materials. Plastic drums, jerrycans, and other containers for the storage and transportation of liquids are made using the blow molding method.
- Household items: A range of household goods, such as buckets and cleaning supplies.
- Hollow Objects: A two-step method is used to create the hollow constructions of typical street drums and traffic cones. This essential security equipment must be easy for police and street workers to deploy while attempting to control crowds.
- Other Road Safety Products: In addition to water tanks, blow molding is used to make water-filled barriers, fences, rain buckets, portable toilets, double ring drums, IBC tanks, kayaks, solar inner tubes, and other things.
Common Blow Molding Defects & Solutions
1. Sink & Splay Marks
An issue is indicated by sink marks, which appear as tiny dents or dips on the molded item’s surface. They happen when the material cools at a different pace.
Solution:
Change the setup by extending the cooling period or reducing the temperature at which items gather. Make sure there is some weight to support the gradual texture shift. The product will benefit from this since it will lessen sink marks and promote even cooling.
2. Air Bubbles or Voids
These issues occur when air becomes trapped in a material, giving the appearance of damage or flaws in the final product. Sometimes they are referred to as voids or bubbles.
Solution:
To improve the texture flow and prevent this, raise the mold’s temperature. Furthermore, increasing the force of the hit increases the possibility of discussion. The form must also have adequate ventilation.
3. Poor Surface Finish
A subpar or uneven floor finish can reduce the final product’s overall quality and make it less appealing.
Solution:
The shape will stay smooth and clean with regular cleaning. For a more consistent and seamless outcome, think about modifying the pressure and temperature settings.
4. The Parison Twist Problem
During the extrusion twist, a plastic tube twists rather than remains straight. The product might not be consistent or in the right shape, according to the conclusion.
Solution:
By altering the temperature at which the parison is ejected, the twist can be fixed. The parison may hold its shape better if the temperature is lowered.
5. Problems with Ranking
Rankling appears as lumps on the product’s surface. Ensure that the plan is simple to follow. The most common reason is too much heat.
Solution:
Modify the mold temperature or blowing time. Make sure the fabric has had enough time to cool before finishing to avoid scorching.
Ways To Choose the Right Blow Molding Technique
- Production Volume
- Determine Wall Thickness Needs
- Compare Costs and ROI
- Consult with Experienced Manufacturers
- Consider Material Compatibility
- Observe Part Complexity
Blow Molding Vs Rotational Molding
There are two distinct techniques for creating hollow plastic objects: blow molding and rotational molding. Their goals and methods of operation, however, are very different. The blow molding process involves heating the plastic shape and then utilizing air pressure to inflate it inside a mold. This technique is perfect for quickly producing a large number of thin, identical products, such as bottles and containers. Because the process is faster and more automated, producing large quantities of goods is less expensive. Nevertheless, it offers less design flexibility and less control over wall thickness.
The fundamental method of rotational molding, often known as rotomolding, involves pouring plastic powder into an empty mold. After that, the mold is heated and rotated in two directions to guarantee that the interior is evenly coated. The design is excellent in producing large, complex, and durable empty objects, such as playground sets, tanks, and specialty containers. It is preferable for small to intermediate production levels since it offers good quality and flexible possibilities, despite the fact that it is slower and needs more manpower. Because each technique has its own benefits, the decision is influenced by a number of factors, including the item’s intricacy, the material used, the volume of goods you need to manufacture, and your financial status.
Conclusion
JACKWIN, your manufacturing partner, can develop traffic safety products tailored to your business’s requirements. Maintaining the highest quality standards throughout your manufacturing process is our goal. We pledge to assess the progress of the materials and finished goods from the beginning of the project to its conclusion. You can rely on us as we streamline your intricate manufacturing records. Time to get your quote today!

