

-80x69.png)
As a driving training or road safety training facility, parallel parking with cone set up is a part of your job. But remember that where the parallel parking space gives trainees the judgment of real parking space, incorrect setup poses several issues. Such as failing the driving test, misalignment with official testing standards or state requirements, and a lot of confusion.
That’s why we’ve designed this step-by-step guide. The purpose is to provide you with all necessary guidelines and enable you to accurately arrange cones for parallel parking setup.
Understanding Parallel Parking
As the name suggests, parallel parking is a way of parking a vehicle exactly parallel to another vehicle. As a car owner, you have often parked alongside the parking section on the road. Or between already-parked vehicles. This is actually parallel parking.
What is Parallel Parking with Cones?
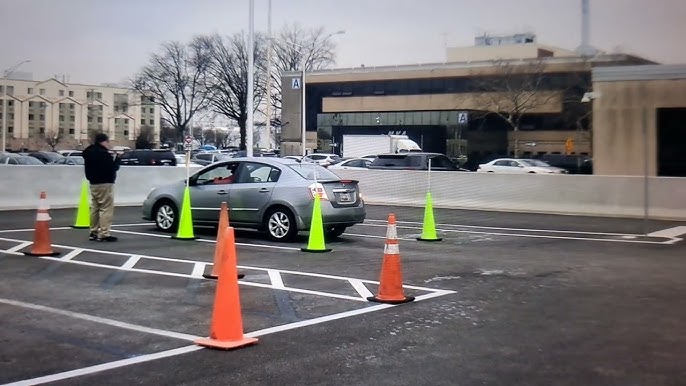
Parallel parking with cones (often known as traffic cones, safety cones, construction cones, road cones, or parking cones) is basically a training practice where a driver parks the vehicle parallel to rectangular-structured traffic-cones on the road. Driving training facilities use this method to create a parking-practice area for trainees.
Instead of parked cars, they use traffic cones and place them to form a rectangular parking space (showing the front, back, and sides). The purpose of this practice is to help drivers learn how to safely park (without hitting a vehicle) before parking in real parking spaces.
Setup Area Requirements
Here’s what you’ll need to create a correct parallel parking space with cones:
- Flat, open surface: We suggest you opt for a level area, such as a parking lot or driving range.
- Parking space minimum length: At least 24–26 feet (7.3-7.9 meters) long to simulate a real parking space.
- Parking space minimum width: Around 8–10 feet (2.4-3 meters) wide. This lets the driver easily maneuver.
- Clear entry/exit path: There should be enough space in front and behind. So that driver can safely move in and out.
- Safe environment: Ensure no heavy traffic, pedestrians, or obstacles are nearby.
- Visibility: Prefer for practice in daytime. But if practice happens early in the morning or evening, the area should be well-lit.
- Total Parallel Parking Space Area: It should be 50–60 feet (15-18 meter). This is the minimum area requirements for a driver to move in, park and move out.
Materials Required for Parallel Parking Cone Setup
- Traffic cones (at least 4–6)
- Measuring tape or wheel
- Chalk or marker (for markings)
- Safety flags or reflective tape (optional, can be used for visibility)
- Cones with weighted bases (recommended for outdoor use)
- Cones of different heights (optional, for advanced practice)
- Safety vests (if setting up in an open area or near traffic)
- Notepad or clipboard (for recording measurements or trainee notes)
Parallel Cone Set Up Guide Step-by-Step Instructions
Step 1: Measure the Length of the Parking Space
The first step is to measure the total length of the parking space (you want to create). Ideally, the total space for parallel parking with cones should be 50–60 feet (as we mentioned earlier in the area requirements section). But if you want a set-up for standard training, a space of 25 to 27 feet long also works well.
Tip: We suggest you use a measuring tape or measuring wheel. This helps you in accurately measuring the length.
Step 2: Mark the Front and Back Cone Positions
Now that you have decided the total length, it’s time to mark the starting point (for front cone) and ending point (for back cone) on the ground. These two marks will highlight the limits of the parking space.
Step 3: Set Up the Front Cone
After you’re done marking, grab and place the first traffic cone on the front mark. Make sure it stands straight and is stable. If it’s unstable or the setup is outdoors, we suggest you use a Jackwin’s rubber base weight. This holds the cone in its place and prevents it from falling over.
Step 4: Set Up the Back Cone
Now, place the second traffic cone at the back mark. Make sure that the distance between both front and back cones exactly match with your total measured parking length.
Step 5: Highlight the Curb-Side Distance with Marking
From both cones, measure the area around 50–60 feet perpendicular to the curb or edge. This helps you to measure the parking lane width to create a wide space with cones. Once measured, grab a chalk and mark this distance clearly on the ground.
Step 6: Place Side Cones to Simulate the Curb
Now, place 2–3 cones (or more) along the side at the marked parking width. These cones simulate the curb. Plus, help the driver (or trainee) properly align their car. But make sure you don’t place the cones too far or too close.
Tip: For more accuracy, use chalk lines to connect the cones. This simple trick makes the curb more visible.
Step 7: Double-Check All Measurements
You’ve already finished the parallel parking setup with cones in step 6. However, we suggest you double-check and re-measure all distances (length, width, and spacing) between cones because a small error in measurements can confuse trainees or result in improper practice.
Step 8: Test the Setup with a Vehicle for Accuracy
Once everything is set, and you’re sure, now test the parallel parking space yourself using a vehicle or ask a team member. Make sure there’s realistic room for vehicle movement, turning, entering and exiting.
How Far are the Cones Apart for Parallel Parking?
Well, the exact distance requirements vary depending on your location, state DMV requirements as well the vehicle you use for training. But generally, the standard distance between the cones for parallel parking in the US is 8.6-25 feet (which is approximately 2.6-7.6 meters).
Apart from that, other key measurements for parallel parking with cones test include:
- Cone spacing (nearly 25 feet apart)
- Side cones width (7-8 feet apart)
- Total spacing (1.5 times the length of your vehicle)
To know exact distance requirements, we suggest you check your state’s DMV guidelines for more details.
Idea Distance Between Cones for Parallel Parking
As we mentioned earlier, the ideal distance between cones in a parallel parking setup depends on your vehicle details. Generally, the length between the front and back cones should be around 25 to 27 feet. And the width (from the curb-side cones to the opposite side) should be about 7 to 8 feet.
To put it simply, the space from all sides should be at least 2–3 feet longer than your vehicle’s length and width. For instance, if your vehicle length is 21 feet, then add 2–3 feet on both length and width. And then mark and place the cones for parallel parking setup accordingly.
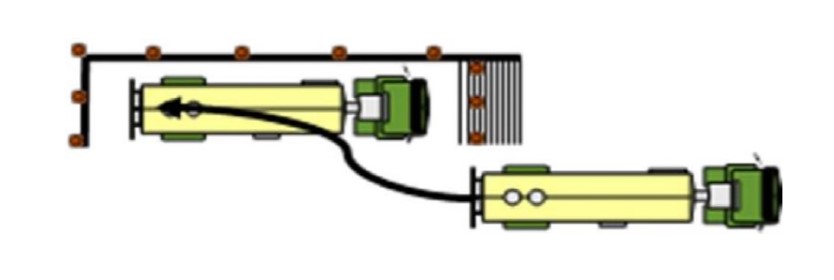
Parallel Parking Diagram with Cones
Common Mistakes to Avoid in Cone Spacing for Parallel Parking Setup
Improper traffic cone placement for parallel parking training can hinder and frustrate learners when they are unable to park. To ensure the drivers get the most out of this practice, avoid these common mistakes:
- Less distance between the front and back cones
If the gap is too tight, whether from front, back or sides, it becomes frustrating for the driver to move or exit from the car. That’s why it’s recommended to place cones on both sides 2–3 feet away from the vehicle’s length and width.
- Too much space between cones
As we said above, congested space is restricted, so is too much space. Because the purpose of parallel parking is to practice how to park before actually parking in public places. So if you place cones too far in set up, this creates a false expectation of parking spaces.
- Uneven cone placement
When cones aren’t aligned properly or even if one is placed far away from others, it damages the entire parking angle and discards the purpose of parallel parking. To avoid this mistake, we suggest you create parallel parking set up at a level ground with proper area measurements.
- Not double-checking measurements
Skipping a final check often poses confusion, frustration, and you need to set up from scratch. So every time you’re done with setting up parallel parking structures with cones, always double-check and test with vehicles (before trainees practice).
- Training in Low-Visibility Conditions
Training in low-visibility conditions isn’t restricted, but poor visibility can cause problems. So, it’s always recommended to schedule parallel parking practice during the daytime. Or if done at night, make sure the area is well-lit for better visibility.
- Setting up too close to walls, trees, or obstacles
If the setup is near a wall or obstruction, it hinders drivers from safely maneuvering in space and can also create a risk during training.
- Using damaged or unstable cones
If you use damage, low-quality or small size traffic cones, it keeps falling, and they won’t properly guide the learner. So always use visible, good-quality, and stable cones.
JACKWIN’s Tips for Choosing Correct Parking Cones for Parallel Parking Cone Setup
You’ll find traffic cones in the market in various varieties. But keep in mind that not just any cone will do the job. As a driving or road safety training facility, you should consider several things before choosing traffic cones for your business, such as cone size, quality, material choice, key features, or cost.
That’s why in the section below, we’ve shared several tips to help you in choosing the right parking cones for every type of parallel parking setup:
- Since it’s difficult to notice small objects from vehicles, so go for at least 28 inches tall cones. This height ensures visibility from inside the car.
- You often schedule sessions during low-light conditions, so we suggest you go for cones with reflective strips, like Jackwin cones that come with reflective collars.
- Light cones can easily fall due to wind or slight tire touches. So it’s recommended to go for heavy and durable road cones.
- Traffic ones come in various colors range. You must ensure that you choose bright and high-visibility colors. They help learners judge distances more accurately.
- Beginner drivers often hit cones during practice sessions. So, if you use low-quality material cones, they get damaged early due to frequent hits. However, Jackwin’s traffic cones are flexible, soft, and not easily damaged.
- Most facilities purchase traffic cones in different sizes. But we suggest you choose one big size and bright color and purchase cones in bulk in that size and shape.
- If your facility offers outdoor training, go for cones that can withstand rain, UV exposure, and temperature changes. If you ignore this, cones get damaged early, you need to purchase them often, which costs you more money.
Pro Tip: If you run multiple training setups in the same area, go for customized traffic cones with your facility logo or name. That way, your facility instructors and trainees easily identify which cones are part of the parallel parking zone.
Conclusion
We hope that after reading this guide, you now know the correct method of creating parallel parking settings with traffic cones. However, it’s crucial that you use highly-visible, durable and reflective traffic cones and correctly follow cones placement guidelines that we have discussed in this guide.
If you’re looking for high-quality traffic cones that are also available at wholesale rates, check JACKWIN traffic cones catalog. We have a large stock available in different sizes, materials, and colors. Our team also manufactures custom-made traffic cones for clients. Contact us today to get a quick inquiry from our team!

